Instructional Guide: How to Install a Chimney Cap
A chimney cap is an essential component for your chimney that serves various purposes, including keeping debris and animals out, preventing rainwater from entering, and improving chimney draft. Installing a chimney cap is a relatively straightforward process that can be done by homeowners with some basic tools and DIY skills. Follow these steps and know how to install a chimney cap safely and effectively.
Materials and Tools Needed:
- Chimney cap: Choose a cap that matches the size and shape of your chimney flue. Make sure it’s made of durable and rust-resistant materials like stainless steel or copper.
- Screwdriver or wrench: You’ll need this to secure the chimney cap to the flue.
- Chalk or marker: Use this to mark the placement of the chimney cap.
- Ladder: To access the roof and reach the chimney.
- Safety gear: Wear appropriate safety gear, including gloves and safety goggles.
Step 1: Safety Precautions
Before you start, ensure your safety by wearing the necessary protective gear and positioning the ladder securely on a level surface. Keep in mind that working on a roof can be dangerous, so exercise caution throughout the process.
Step 2: Measure the Flue
Measure the dimensions of your chimney flue to ensure you select a chimney cap that fits properly. You should choose a cap that covers the entire flue opening, extending a few inches beyond the flue perimeter.
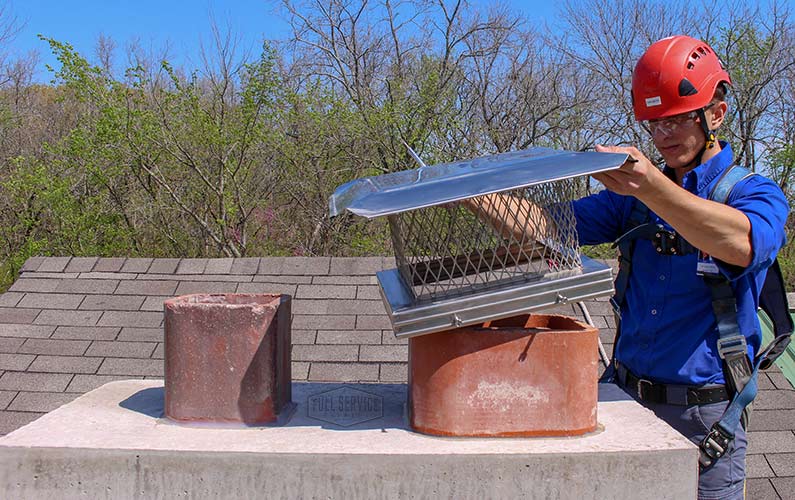
Step 3: Position the Chimney Cap
On a clear and calm day, climb the ladder to the roof. Carefully place the chimney cap over the flue, making sure it’s centered and aligned with the flue opening. Use the chalk or marker to mark the spots where you’ll attach the cap.
Step 4: Secure the Chimney Cap
Use your screwdriver or wrench to attach the chimney cap securely to the flue. Most chimney caps come with brackets or screws that should be fastened to the flue’s outer surface. Make sure the cap is tightly secured to prevent it from being dislodged by strong winds or animals.
Step 5: Double-Check and Clean Up
Double-check the installation to ensure the cap is securely fastened and there are no loose components. Afterward, carefully descend from the roof, and remove the ladder.
Step 6: Test and Maintenance
After installing the chimney cap, periodically inspect it to make sure it remains in good condition. Check for any signs of damage or rust and replace it as needed. The cap should enhance the safety and efficiency of your chimney, so it’s important to keep it well-maintained.
Conclusion
By following these steps and practicing safety precautions, you can know how to install a chimney cap perfectly to protect your chimney from debris, animals, and water infiltration. It’s a relatively simple DIY project that can provide long-term benefits for your home.
Continue Reading